최근 이걸 2021.09.08 - [데엔스터디5] Airflow Deep Dive 들으면서 airflow를 이것저것 보고 있다.
그래서 간단하게 살펴본 web UI에 대해서 기록해보려고 한다.
우선 Airflow는 파이썬기반의 데이터파이프라인 프레임워크이다.
그래서 데이터파이프라인을 DAG라고 작성하면서 쉽게 생성하고, 관리해주는데 유용한다.
특히나 web UI를 지원해줘서 어떤 데이터파이프라인이 언제 실행되고, 어떻게 실행되는지를 볼 수 있다.
AirFlow의 DAG는 데이터파이프라인을 의미하는 하나의 단위이다.
하나이상의 Task를 가지고 있고, 그 각각의 task들은 실행순서를 가지고 실행이 된다.
예를 들어 내가 작성한 DAG 파이썬 코드를 리뷰해보자면..
openWeatherAPI를 통해 최근7일의 날씨 데이터를 Redshift에 저장하는 하나의 파이프라인을 DAG로 작성한 것이다.
import requests
import json
import logging
from datetime import datetime
from datetime import timedelta

# airflow추가
from airflow import DAG
from airflow.operators.python import PythonOperator

# 환경변수 추가
from airflow.models import Variable

# Connection객체 추가
from airflow.hooks.postgres_hook import PostgresHook

def get_Redshift_connection():
    # autocommit is False by default
    hook = PostgresHook(postgres_conn_id='redshift_dev_db')
    return hook.get_conn().cursor()

def extract(**context):

    api_key = Variable.get("open_weather_api_key")     # APIKey 환경변수
    api_url = Variable.get("open_weather_api_url")     # APIURL 환경변수

    lat = context['params']['lat']               # 위도 파라미터
    lon = context['params']['lat']               # 경도 파라미터

    request_url = api_url+"lat=%s&lon=%s&appid=%s&units=metric" % (lat, lon, api_key)
    response = requests.get(request_url)
    data = json.loads(response.text)

    return data

def tranform(**context):
    data = context["task_instance"].xcom_pull(key="return_value", task_ids="extract") #extract함수에서 return한 value를 받아옴

    result =[]
    for d in data['daily']:
        day = datetime.fromtimestamp(d["dt"]).strftime('%Y-%m-%d')
        result.append("('{}',{},{},{})".format(day, d["temp"]["day"], d["temp"]["min"], d["temp"]["max"]))

    return result

def load(**context):
    schema = "yourself"
    table = "weather_forecast"
    cur = get_Redshift_connection()
    result = context["task_instance"].xcom_pull(key="return_value",task_id="transform") #transform함수에서 return한 value를 받아옴

    init_table_sql ="DROP TABLE IF EXISTS {schema}.{table};\
                    CREATE TABLE {schema}.{table} (\
                    date date,\
                    temp float,\
                    min_temp float,\
                    max_temp float,\
                    updated_date timestamp default GETDATE());".join(result).format(schema=schema, table=table)

    insert_data_sql = """DELETE FROM {schema}.{table};INSERT INTO {schema}.{table} VALUES """ + ",".join(result)
    insert_data_sql = insert_data_sql.format(schema=schema, table=table)

    try:
        cur.execute(init_table_sql)
        logging.info("create table")

        cur.execute(insert_data_sql)
        logging.info("insert data")

        cur.execute("Commit;")  # Connection객체를 사용할 경우 autocommit은 항상 False!!
    except Exception as e:
        cur.execute("Rollback;")


openweather_dag = DAG(
    dag_id = 'Weather_to_Redshift_test',
    start_date = datetime(2021,9,3), # 날짜가 미래인 경우 실행이 안됨
    schedule_interval = '0 2 * * *',  # 적당히 조절
    max_active_runs = 1,
    catchup = False,
    default_args = {
        'retries': 1,
        'retry_delay': timedelta(minutes=3),
    }
)

# task생성 : extract,tranform,load 각각 task
extract = PythonOperator(
    task_id = 'extract',
    python_callable = extract,
    params = {
        'seoul_lat' : 37.5665,  # 서울위도
        'seoul_lon' : 126.9780  # 서울경도
    },
    provide_context=True,
    dag = openweather_dag)

transform = PythonOperator(
    task_id = 'transform',
    python_callable = transform,
    params = {
    },
    provide_context=True,
    dag = openweather_dag)

load = PythonOperator(
    task_id = 'load',
    python_callable = load,
    params = {
        'schema': 'yourself',
        'table': 'weather_forecast'
    },
    provide_context=True,
    dag = openweather_dag)

# task의 순서
extract >> transform >> load
Airflow DAG
이렇게 DAG 파일을 작성하고, ariflow의 서버에서 DAG폴더에 저장을 한다.
그러면 airflow가 스크립트를 읽어서 데이터파이프라인을 인식하고, 웹UI에 DAG를 띄우게 된다.
참고로 airflow가 스크립트를 읽어오는 그 인터벌을 조절할 수 있다. (디폴트는 5분)

Airflow Task
그리고 해당 dag를 선택하면 이렇게 task에 해당하는 상태를 볼 수 도 있다. 상태에 따라서 color도 구분이 가능하다.

아 ariflow의 장점으로는 backfill을 지원한다는 점인데
DAG를 작성할때 옵션으로 cathup을 True로 설정하면 start_date이전에 모든 시간들도 다 스케쥴링이 돈다.
그리고 Task 인스턴스 (작고 소중한 네모네모 하나하나)를 눌러보면 아래와 같은 팝업이 뜨는데
여기에서 "LOG"를 누르면, task의 log를 자세하게 볼 수 있따.
이 로그에는 python에서 printl한다거나 logging으로 작성한 내용들이 나타난다.


Airflow Admin - Variable
그리고 코드에서 보면 이렇게 직접 하드코딩으로 변수 값을 넣지 않고, 환경변수 설정을 했다.
api_key = Variable.get("open_weather_api_key") # APIKey 환경변수
api_url = Variable.get("open_weather_api_url") # APIURL 환경변수
이 환경변수는 Airflow의 웹-Admin-Variables에서 직접 key와 val을 지정하면 된다.

Airflow Admin - Connections
그리고 코드에서 redshift의 연결 또한 아래와 같이 직접 하드코딩으로 db연결정보를 넣지 않았다.
# Connection객체 추가
from airflow.hooks.postgres_hook import PostgresHook
def get_Redshift_connection():
# autocommit is False by default
hook = PostgresHook(postgres_conn_id='redshift_dev_db')
return hook.get_conn().cursor()
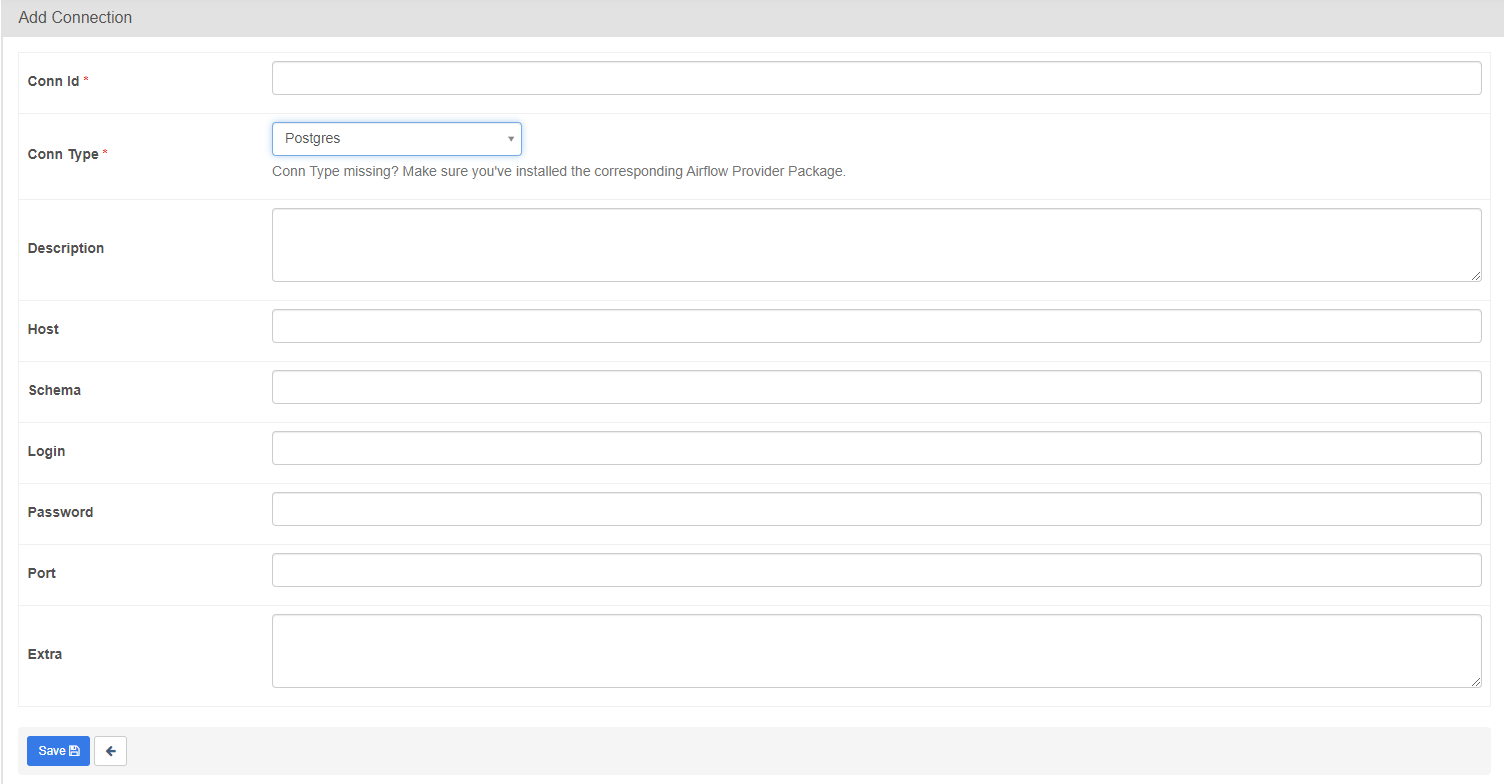
환경변수처럼 Airflow의 웹-Admin-Connections 에서 직접 db연결정보를 넣게 된다.

여기에서 conn type은 현재 DAG작성시 설치한 DB패키지들이 나오는데
나는 postgreSQL 관련 패키지를 설치해서 나오는데, PostgreSQL을 연결타입으로 설정할 수 있었다.
참고로, conn type에 Amazone Service를 선택하면 S3와도 연결할 수 있었다.
'🌿 Data Engineering > Data PipeLine (Airflow)' 카테고리의 다른 글
| KubernetesPodOperator으로 로컬 k8s에서 airflow 배치작업 만들기 (0) | 2024.01.21 |
|---|---|
| [로컬 환경에서] 쿠버네티스 구축하기 (kind, docker-desktop) (2) | 2024.01.15 |
| [로컬 환경에서] AWS MWAA (ariflow) 구축하기 (1) | 2024.01.07 |
| AWS ec2(Ubuntu)에 Airflow2.0 설치하기 (0) | 2021.09.03 |
| Airflow 한번 맛보기 | Apache Airflow란? (0) | 2021.04.16 |
| 데이터파이프라인(datapipeline)이란? (0) | 2021.03.10 |


